Tuesday, February 25, 2014

NEW: LEICA X VARIO IN SILVER


The following press release from Leica reached us this morning:

Allendale, NJ (February 25, 2014) - Leica Camera presents a sleek, silver version of the Leica X Vario as an alternative finish to the understated black of the standard model. In classic black or stylish silver, the Leica X Vario is a product that epitomizes the Leica’s trademark quality and offers even greater versatility and creative freedom as well as brilliant image quality.

The Leica X-System is defined by its high-performance, APS-C format, CMOS image sensor with over 16.5 megapixels (effective 16.2 MP), remarkably large compared to other cameras in its class. The Leica X Vario is the first compact camera to combine this professional sensor with a high-performance zoom lens – the Leica Vario Elmar 18–46 mm f/3.5–6.4 ASPH. – and, as a result, delivers particularly brilliant exposures in all photographic situations.

For expansive interior shots, landscapes or portrait photography, the zoom range offered by the Leica X Vario allows entirely new horizons for creative photography. Its versatility is further emphasized by a full-HD video recording function, along with crystal-clear sound recording, that lets photographers capture those special moments in moving pictures with a resolution of 1920 × 1080 pixels at a frame rate of 30 full frames per second. A wide range of camera setting options and fast, precise autofocus further enhance the features offered by the Leica X Vario, a camera with a performance profile that offers even the most demanding photographers maximum creative freedom for spontaneous shots as well as for carefully arranged compositions.

Leica also offers an extensive portfolio of accessories for the X Vario that can be added to the camera to make it easily adaptable for every photographic situation. For example, the Leica EVF 2 Viso-Flex electronic accessory viewfinder with 1.4 megapixels and 90° swivel function is extremely helpful when shooting from unusual angles. The accessories also include a handgrip and finger loops in three different sizes that perfectly balance the weight of the camera in the photographer’s hands. An optional lens hood diminishes reflections, and the Leica SF 24 D flash unit offers greater freedom for subject lighting. The portfolio of accessories is further complemented by a comprehensive range of premium-quality bags, cases and straps.

The silver X Vario and the entire range of optional accessories are now available at select Leica Stores, boutiques, and authorized dealers across the U.S.


Thursday, February 20, 2014

FINE ART PHOTOGRAPHY OF THE FEMALE NUDE


Historically, the human form has fascinated artists probably more than any other subject. Therefore it should come as no surprise that the same fascination has extended to photography as well.
 
While photography has generally been accepted as a valid art form, photography of the nude to this day is struggling with that recognition.  In the view of many, it is still looked upon as sleazy and objectionable, even harmful.  No such objections exist when it comes to paintings and sculptures.  People regularly visit art galleries.  No objections are generally voiced to see nude art there.  Public spaces often display nude sculptures, no objections there either.  Yet nude photographic art is still widely rejected.  Why?

Heinz Richter

Marlies Amling

I must emphasize that the key word here is art.  Many of the great photographers have produced fine art nudes like Alfred Stieglitz, Edward Steichen, Edward Weston, Man Ray, Helmut Newton…, just to mention a few.  Of course, just as with other art forms, some like Robert Mapplethorpe or Jeff Koonz for instance have pushed the envelope by producing images that are questionable to some, but such work should not be generalized and held against other serious photographers.

I often discuss this with my sister who is a successful professional photographer in Germany.  She is often in disbelief how much more restricted photography of this type is in the US.  For instance, in her studio she has three different display windows for her work, one of which is usually dedicated to fine art nude photography.  That is simply unthinkable in the US.

Marlies Amling

That brings up the question of what constitutes fine art nude photography.  During my 13 years of teaching photography that question regularly came up during class discussions.  Of course the definition of art in general is in the eye of the beholder.  There are no clear cut instructions to be had.

Heinz Richter

Marlies Amling

Heinz Richter

When it comes to fine art nude photography, it is quite easy to take a photograph of a person without any clothes.  That, however, is not art and should not be attempted to be presented as such.  Instead the emphasis should not be so much on nudity but on shape, form, lighting, design and composition.

That adds a considerable amount of difficulty which is further emphasized that in most cases, a similar approach with similar results has been done before.

In an interview, Kim Weston, grandson of Edward Weston, when asked about his photography in comparison to his grandfather’s said that he generally does not think about him.  He went on to say whatever kind of photograph he might attempt, “Edward has done it.”  He said he cannot take a landscape without being told that Edward has done it, he virtually cannot photograph anything without the constant reminder that Edward has done it.

Marlies Amling

The same is the case with fine art nude photography.  Regardless of the outcome, someone most likely has done it before and someone most likely will do it again in the future.

The best approach in my opinion is to carefully plan a fine art nude photography session and then proceed without too much attention to the work of other photographers.  Then careful selection of only the best examples with a healthy dose of self-criticism should give the assurance that the shoot was successful.  And don’t forget, the old adage the practice makes perfect still applies.

Heinz Richter

Heinz Richter

Heinz Richter

Heinz Richter

Blaine Schultz

As of late, Photoshop has opened photographic possibilities that previously were impossible or at least very difficult to achieve.  But a lot of what Photoshop has to offer, contrary to what many seem to assume, is not available merely at the push of a button.  Anyone who has ever worked with Photoshop will agree that there is a considerable learning curve; to master it certainly does not come overnight.  However, one does not need to be afraid of it.  Photoshop definitely can be learned to quite an extend simply by trial and error, although professional instructions will definitely speed up the learning process.

Opinions about the system are diverging to quite a degree.  Some see it as nothing more than a means to cover mistakes that occurred during shooting.  While many such mistakes can definitely be corrected with Photoshop, it is not a panacea to everything that might possibly go wrong.  Just as in the past, it is definitely advisable to strive to do everything correctly during a shoot.  That, of course, requires a considerable base knowledge.  As a matter of fact, Photoshop should not al all be considered a means to become a good photographer without knowing photography as such.  Composition, posing, lighting, exposure control, camera operation…., all are still as important today as they were in the past and there is little that Photoshop can do to overcome those shortcomings.

Others criticize images modified with the help of Photoshop as not original photography any longer.  A colleague of mine recently claimed that “real” photographs are only ones that are shown as they come out of the camera.  I find that rather short sighted.  Even in the past we used retouching and a variety of darkroom trickery to alter the images as they came off the negative.  It was quite common to alter the resulting photographs with changes in development, both film and paper.  We used manipulative processes like solarization, bas relief, posterization and a lot more to create images that certainly differed substantially from what the lens put on film.  Thus I find these criticisms quite out of place.

The most important part of creating a photographic image is the end result.  How we arrive at that ultimately is irrelevant.

Following are a number of images that made extensive use of Photoshop, and while the results certainly required a lot of work, it was ultimately a lot easier and less time consuming to create them with the help of Photoshop than what would have been necessary to come up with similar results during the “good old days.”

 
This Image is from an architectural photography assignment

Studio shoot of a model with very similar lighting

Combining the images rendered a great location shoot

The original image unfortunately is lost.  This image is the result of modifying the original and making three identical copies, one of which was right and left reversed and combining them in the manner shown


The three images above were combined to render this unusual result


The two base images were combined with considerable modification into this result

As I mentioned before, most topics of photography are quite difficult to do if one tries to find a different approach, something that has not been done by other photographers before.  That is especially the case with fine art nude photography.  The nude has always been a very popular theme of the arts, including photography.  Regardless of how one approaches the subject, it probably has been done in one form or another before.

I had been looking for such a different approach for a long time, and finally decided to use Photoshop to reach that goal.  The result is “Photosculptures,” where I use photographs of sculptures and combine them with photographs I have taken of models.

That might not appear to be particularly difficult.  After all, Photoshop is used to alter images in just about any imaginary way.  However, Photosculptures require a lot more than just replacing part of the sculpture with a photograph of a different person.  It is important that the pose of the model and the lighting coincide with that of the sculpture, however, it is not my intention to produce a perfect copy of the original.  Then the two images have to be carefully matched in size.  Finally, the transferred image has to be modified to match the color and texture of the sculpture.  All of this is not an easy process, and it is very time consuming.  But the end results can be quite rewarding.

This is the most difficult sculpture I modified, because it consists of three different individuals

The original, raw images of the three models, all taken with Leica equipment.

The original photograph of the three models required considerable modifications.  All had to be right and left reversed.  Then all three had to be matched in size to the size of the sculpture.  In addition, the posing angle of the models was altered to match that of the sculpture. Then, after masking off the background, the images of each model were transferred to the photograph of the sculpture.  Then each model was altered to match the white marble of the sculpture.  That included lowering the contrast of the facial features and the hair to again match the sculpture.

The finished Photosculpture

                    Original                                                                         Photosculpture

The original is a photograph of the Rolls Royce hood ornament.  Since the pose of the model was not identical to that of the sculpture, it required considerable modification of the hair flowing in the wind.

                     Original                                                                        Photoscupture

This example required a considerable amount of work.  While the poses are quite similar, the arms did not look right at all.  It required to remove the hand on the arm of the male which, in turn, required the arm of the male in the Photosculpture to be lengthened.  In addition, marble texture and color was added to the Photosculpture.

                     Original                                                                       Photosculpture

Even though the pose of the original and the model are quite similar, this example required a considerable amount of detail work.  The upper arm of the model had to be lengthened to match up with that of the original sculpture.  The wing of the swan had to be lengthened a lot to bridge the void that otherwise showed in front of the model’s face.  In addition the head of the swan needed to be moved further from the neck.  Since the position of the left arm of the sculpture and the model are quite different, a fair amount of reconstructive work was necessary to cover the arm of the original sculpture.

                     Original                                                                       Photosculpture

This example was relatively easy to convert.  However, the strong lighting of the original required close attention to the lighting of the model.

Accurate posing of the model definitely makes this kind of work considerably easier.  For that reason it is advisable to work with experienced models that are able to strike a great variety of poses and do it accurately once they see a sample of what pose is required.  I have worked with most of the models shown here on several occasions, with some of them even for several years.  That has created a very good working relationship which is also very helpful for this kind of work.

Regardless of what approach one choses to take with these types of photography, none of it will come easy.  Especially for a novice there is a lot to learn and master.  For that reason I want to invite anyone interested to rely on my experience by asking questions, whatever they might be.  I’ll gladly help.


-------------------------------------------------------------------------------------------------------------------------------------------

Please make payment via PayPal to GMP Photography
Click on ad to enlarge

Please make payment via PayPal to GMP Photography
Click on ad to enlarge

Please make payment via PayPal to GMP Photography


Wednesday, February 19, 2014

WestLicht 25th CAMERA AUCTION


On March 22, 2014 the 25th WestLicht Camera Auction will take place.  As usual, some rare Leica items will be offered again.  The complete offer can be found in WestLicht’s on-line catalogue, which will be available 4 weeks prior to the auction.

To order the complete catalog, go to: http://www.leicashop.com/brandnew_en/auctioncatalogue.html


Lot 53 - Leica IIIf Midland set


Very rare IIIf body with self timer in perfect, original condition, top plate engraved 'Ernst Leitz Canada Limited Midland Ontario', with matching Ernst Leitz Canada Ltd. Midland Summarit 1.5/5cm no.1246980 (cap) and Leicavit SYOOM engraved 'Ernst Leitz Canada Limited Midland Ontario' only small batches of the IIIf were prepared by Leitz Canada and engraved with the name of the Canadian manufacturer, camera no.684768 is shown in Lager I p.69

Serial No. 684716
Year: 1953

Startprice: 8,000 EUR
Estimates: 16,000 - 20,000 EUR


Lot 153 - M6 (Electronic) Prototypes + Design Models


These four cameras (ex Leitz Museum) show the evolution of M6 from the wooden design model to a working prototype camera:

(1) wooden demonstration model with metal lens mount, frame selector and apparently very long film winding mechanism, covered with leather and marked ' MADE BY LEITZ PORTUGAL ' on the back , the top plate is unmarked, but with the typical Leica Museum sticker numbered '1405'.

(2) The second model already has metal applications, the base plate is removed by a centrally placed screw, only the shutter
speed dial, the rewind crank and the frame selector lever can be moved, the top plate shows the red Leitz logo and the lettering 'LEICA M6 ELECTRONIC'.

(3) The third model is probably the most planned study, the base plate has a battery chamber and a motor connection with a cut-away model of a Motor Drive R4, the top plate is beveled on the side of the rewind crank, the shutter speed dial, engraved with 100, B, X and 1-1/1000 sec. above the ISO setting dial and exposure compensation, on the back of the top plate is a switch similar to the Leica R3, the back is fitted with a DIN/ASA indicator, top plate engraved 'LEICA M6'. With unmarked dummy lens.

(4) The  last camera  is already a  fully  functional prototype,  the top plate is engraved: 'ERNST  LEITZ  WETZLAR  GMBH', on front: 'LEICA  M6',  the base plate with the Leica Museum sticker with number '2308', shutter speed dial and film indicator show clear differences to the later production model, the cameras leather covering is marked 'MADE IN GERMANY', with serial number 1621532 (approx.1983) which is  assigned to M4-P.  The first official production camera is no.1657251. The Leica M6 was the first Leica with TTL exposure metering in a classic M housing. All the electronics finally found space in the area of the previously built-in self-timer.

Year: c. 1980-1984

Statprice: 40,000 EUR
Estimate: 80,000 - 100,000 EUR


Lot 208 - Monochrom 'Ralph Gibson Edition' Pre-Series


Unique chrome Monochrom 'Ralph Gibson' edition with red signature on top plate and red leather covering, in new condition with certificate and maker's box, with matching chrome Summicron-M 2/35mm Asph. no.4047586, complete in maker's box

Serial No.: N02/35
Year: 2013

Startprice: 10,000 EUR
Estimates: 20,000 - 25,000 EUR


Lot 279 - Kogaku Seiki Nippon


Very rare Japanese Leica III copy in beautiful and 100%
original condition,
with Nippon-Kogaku Tokyo Nikkor-QC 3.5/5cm no.571107,
according to the Nippon expert Prof. Ryosuke Mori
(see Camera Review no. 58) a maximum of only 100 cameras
were buit just after the war using also parts of other
cameras, only about 20 are known to exist, this is probably
the best of all known cameras regarding its condition

Serial No.: 19553
Year: c. 1945

Startprice: 3,000 EUR

Estimates: 5,000 - 6,000 EUR

To see some of the non-Leica items, go to the WestLicht site at:


Monday, February 17, 2014

LEICA LENSES AND FILTERS


The camera accessory market offers an abundance of filters that we can screw on, slide on or otherwise attach to our lenses.  Along with it there is the never-ending discussion about their necessity.  Filters certainly are not some frivolous item that sinister accessory manufacturers have dreamed up to get their hands onto more of our photography budgets.

For instance, there are color correction filters.  These have lost a lot of their importance with the advent of digital photography where white balancing has virtually eliminated their need.  But especially among Leica users, film and film cameras are still widely used and so are color correction filters.  Anyone who has ever shot under fluorescent lighting appreciates the FLD and FLB filters that get rid of the ugly green cast common under those lighting conditions.  We have the choice of daylight and tungsten film, but have the wrong film in your camera, and you will appreciate a proper color balancing filter to be able to keep on shooting without ending up with overly red or blue images.  Excessive amounts of blue also occur when shooting during winter with snow covered ground on bright, sunny days.  The blue of the sky reflecting off the snow will generally cause an excess amount of blue, something easily corrected with a skylight filter.

Then there are a myriad of special effects filters.  These do apply to equally to film as well as digital photography.  The need or value of them can only be assessed by the individual photographer.  It’s an eye of the beholder thing.

Finally, there is the issue of lens protection.  Many photographers have UV filters permanently attached to their lenses as a means of protecting them in case of a mishap.  They certainly offer a certain amount of protection and the argument that it is a lot less expensive to replace a filter than a lens does make sense at face value.

However, the main reason for UV filters is the fact that some films are sensitive to UV light.  This is out of the range of most lenses color correction with the result that the UV light will be recorded as an unsharp image, adversely affecting the overall image sharpness. UV filters are therefore designed to block any UV light from reaching the film and thus eliminate any of the UV associated unsharpness.

With Leica lenses such filters are unnecessary because Leica lenses are designed to block UV light from transmitting, making UV filters unnecessary.

During a visit with my father to Leitz Wetzlar we toured the entire facility with Rudi Kraut as our guide.  He showed us everything from the camera production to the lens grinding department to the lens assembly.  At one point he introduced us to a gentleman who was working in the lens design department.  During our conversation the topic turned to filters.  I simply asked what, if any, advise he had regarding filters.  His face took on a rather stern look while he answered.

“If we had intended our lenses to have flat pieces of glass in front, we would have designed them that way.”

That caused me to research the topic once we were back home.  After all, how bad can a flat piece of glass in front of a lens be?  Flat is the keyword here.  Unfortunately, some filters are less flat than others.  Ideally, a filter is made of high quality, optical glass and ground from a blank, just like any lens element.  The only difference is that the two surfaces have no curvature.  The same precision and tolerances should be applied as with lenses.  Only that will give the assurance that the two glass surfaces are perfectly parallel to each other.

Unfortunately that is not always the case.  For one thing, there are two distinctly different production methods.  One is the grinding process.  This is an expensive process that is only applied by the top filter manufacturers.  Unfortunately, the majority of filters are made in a much cheaper way.  Here large, flat, narrowly rimmed surfaces are filled with glass granules and then heated to melt the glass into a large sheet.  To make the actual filters, these glass sheets are again heated to the point where they become pliable and the filters are stamped in a process not unlike a cookie cutter.  Cheap but not very precise.  For one thing, the two glass surfaces are not nearly as parallel as can be assured with the grinding process.  Secondly, the stamping does add a considerable amount of physical distortion to the edges of the filter which in turn does adversely affect lens performance.

Spectral transmission is another, important issue.  Many filters need to be made with certain colorations to assure their proper effects.  Here too we find considerable differences in accuracy.  High quality filters are always dyed in the mass, meaning the glasses which the filters are made from receive the correct coloration during the process of making the glass.  Unfortunately this process too is subject to considerable differences in accuracy.

A much less desirable approach is to sandwich dyed gels between two pieces of clear glass to achieve the proper coloration.  Not only are there differences in accuracy regarding the spectral accuracy of the gels, but the problems of parallelism of the filter surfaces are doubled.  This is actually an old, outdated approach and hardly any filter manufacturer outside of Tiffen still uses this process.

Another criterion is the thickness of a filter.  Regardless how perfectly flat a filter is made, it will add a certain amount of distortion to any lens it is used on.  The only variance is the focal length of the lens, with wide angle lenses being more affected by this than lenses of longer focal lengths.

The worst of all filters are the ones made of acrylic rather than glass.  By nature these need to be a lot thicker to assure the desired effects.  In addition, even the best acrylics are not nearly as clear as good, optical glass, thus adding to the undesirable effects of these less expensive alternatives.


The problem lies in the fact that when light hits the filter, it does not transmit straight through unless the light hits the filter in a 90 degree angle.  There will always be a certain offset of the light path.  The steeper the angle and the thicker the filter, the more pronounced this is.  The only filters ever made to prevent this are curved filters.  These are designed for certain focal lengths where the curvature is such that the light path through the glass is always reaching the filter in 90 degree angles.  These filters are prohibitively expensive.

Finally, there are the filter mounts.  Needless to say, we should stay away from plastic ones.  They simply don’t offer enough precision to be worth any consideration.  Most filter mounts are made of aluminum.  However, most high quality lenses also use aluminum for the lens barrels.  Aluminum against aluminum unfortunately has a huge amount of friction.  This quite easily leads to filters being very difficult to remove.  The best filter mounts are the ones made of brass.  Brass against aluminum has a very low coefficient of friction and therefore brass mount filters are always quite easy to remove.

This brings us back to UV filters, permanently attached for protection.  Do we really want this, do we really need this?  Based on the flat glass comment at Leitz Wetzlar, I never use any filters unless absolutely necessary and I have done so for years.  None of my lenses have ever been hurt because I take other safety precautions.  The main one being that I always use a solid lens shade.  That gives any lens a considerable amount of protection because the glass surface of the lens is recessed by a certain amount.  This greatly eliminates the possibility of physical harm.  Of course accidents can happen.  I look at my insurance as a measure to protect my lenses in those cases.

Of course when shooting under condition where these measures are inadequate, a UV filter is definitely a good idea.  For instance when shooting under extremely dusty conditions, or when wind whips up a lot of dust and fine sand, we should not subject our lenses to such ill treatment.  That is where a high quality UV filter is definitely helpful.  But personally, I leave it at that.

Should we all use just Leica filters?  The simple answer is no.  Leica is not a filter manufacturer.  To my knowledge most of their filters are made by Schneider through their B+W division.  B+W have proven to make some of the highest quality filters money can buy.  Equal in performance are the Heliopan filters.  Heliopan is owned by Zeiss.  Staying with those two manufacturers will always give you the assurance of keeping the ill side effects of filters to a minimum.  The top quality filters from Hoya could be added to that category as well.


Considering the overall performance of Leica and other high quality lenses it just doesn’t seem right to put flat pieces of glass in front of them except  unless absolutely necessary.  It especially doesn't make any sense at all to have the light pass through a cheaply made, low quality filter before it even reaches the lens just to save a few bucks.  That approach has served me well over the years and will continue to do so.


Saturday, February 15, 2014

A VERY RARE LEICA M MOUNT LENS


ZEISS HOLOGON


Zeiss Hologon 15mm f/8 on Leica M4-P 

Modern lens design techniques have presented us with a relatively large number of super wide angle lenses of 15, 13 and even 12mm focal length.  All of them are very complicated, multi element designs in order to avoid visible distortion and lack of sharpness due to under corrected optical aberrations.  These lenses have become actually quite common, and few photographers even remember the super wide lens which started it all.

For many years, 21 and 20mm lenses were the maximum 35mm photography had to offer.  Anything with a wider angle of coverage had to be of a fish eye design with all the draw backs of pronounced barrel distortion.  All of this was changed with the introduction of the Zeiss Hologon 15mm f/8 in the early 1970s.  This was unusual in many respects.  Not only was the Hologon the first lens to achieve the unheard of angle of coverage of 110° without the usual fish eye effect, it was also the first post-war marriage between Leica cameras and Zeiss lenses. 

 
Cross section of the three lens elements and the lens position inside the Zeizz Hologon camera body
Note the extreme proximity of the rear lens element to the film plane

The Hologon was initially developed for the Zeiss Hologon camera, which was part of the Zeiss Contarex system.  At the time it was thought impractical to offer the Hologon as an interchangeable lens, even with mirror lock up in the reflex Contarex.  Instead, Zeiss opted for a separate camera body, based on the Contarex with the mirror box removed and with the lens permanently installed.  It was their claim that extremely precise registration and centering was necessary for the lens to perform satisfactorily.

The Leica M cameras also met these criteria and the lens was made available in the Leica M mount also.  It was sold with a special 15mm viewfinder included.  The 15mm Hologon with its undistorted 110° diagonal angle of view is one of the most interesting lens designs in recent years.  Conventional lens design theories would indicate that a lens with such specifications would have to be of a multi-element design.  Computer aided research of wide angle lenses for aerial photography was conducted.  The normal concept of using many thin elements in wide angle lenses was actually revealed as unnecessary.  In fact, only three thick elements proved necessary to assure good performance of the lens.  Subsequently, the Hologon is of a triplet design, although bizarrely shaped.  Thus we have an example of an optical design which would not have been created by using conventional methods.  Furthermore, it is safe to say that manual computations for this design would have literally taken years to complete.

Construction of the lens made the installation of a diaphragm virtually impossible without compromising overall performance.  It was also impossible to offer a speed faster than f/8 for the same reasons, even though some of the modern optical glasses available today might offer the possibility to increase the speed of the Hologon.

It was felt that the restriction of a fixed aperture of f/8 would not pose any great disadvantage.  Besides, a graduated neutral density filter, offering perfectly even illumination across the entire image area, would effectively render a speed equivalent of f/16.  This could also be used in situations where the standard f/8 aperture would lead to overexposure.

Since the Hologon lens renders virtually distortion free images, the camera should be used perfectly level, to avoid excessively converging lines on verticals.  For that reason the 15mm viewfinder had a built-in spirit level, which helped the photographer keep the camera level, especially when shooting hand held.

The ability of an extremely wide angle lens to render virtually distortion free images allow the photographer to shoot many photographs where it is impossible to tell that an extremely wide angle lens was used.  But this is only one of the advantages of such a lens.  The other is that it produces photographs with a rather different perspective.  It is important to pay special attention to the foreground since the extreme angle of coverage will show a considerable amount of foreground when the camera is held level, even when used horizontally.  It is also important to hold a camera with such a lens very carefully.  It is quite easy for the lens to pick up ones knuckles.

The Hologon was designed to render optimum performance at f/8 across the entire image area.  Due to the optical glasses available at the time of its design, the lens did not quite show the high contrast level typically associated with the high quality optics from Zeiss.  In practical terms, this will result in perfectly sharp enlargement up to 8x10 inches.  Bigger enlargements might show a certain lack of crispness when inspected very closely.  Projection of transparencies, on the other hand, will show no adverse effects, because the projected images usually are not inspected very close up.  The same is true with big enlargements when viewed from a more “normal” viewing distance.

The Hologon allowed focusing from 8 inches to infinity.  Considering the great depth of field rendered by such a short focal length, one might initially think focusing to be superfluous.   But it was proven that the overall performance of the Hologon could be improved if the lens was focused properly.

 
Minneapolis IDS Center
15mm Hologon

15mm field of view
Please note: The 15mm field of view images in this article are not separately taken photographs, they were cropped form the original Hologon negatives to present the view of a 50mm lens 

Newer, more sophisticated lens designs have improved the speed of super wide angle lenses and even allow for reflex viewing.  Subsequently, the Hologon has long been discontinued.  But it deserves credit for having been the first of the super wides, and its unusual design will always give it a special place in the history of lenses for 35mm cameras.  Those who own a Hologon can consider themselves lucky indeed.

Minneapolis Lumber Exchange Building
15mm Hologon

50mm field of view

Minneapolis IDS Center Crystal Court
15mm Hologon

50mm field of view

Minneapolis Lumber Exchange Building
15mm Hologon

50mm field of view


Wednesday, February 12, 2014

A MUCH WELCOME LETTER TO THE EDITOR


Dear Mr Richter,

I am writing to you to thank you for your marvellous blog. It is just so well written, informative and entertaining that I just had to say thank you. For the Leica enthusiast it is a must. My German heritage seems to be responsible for my passion for all things Leica! Could be genetic though, my father always told me that if you want a camera, get a Leica...
I hope the recovery from the knee surgery is going well.
Kind regards,

Reimar Junckerstorff

Western Australia


Tuesday, February 11, 2014

LEICA TOUGHNESS – MORE ON THE THEME


Yesterdays article about the legendary toughness of Leica cameras reminded me of another account from a few years ago.

Even though the era of the space shuttle has come to an end, there still is a certain fascination with the achievement of the shuttle program.  Below is an account of one of the launches where the only useable photographs were made with Leica equipment.

From Leica Quarterly October 1982

Several hundred press photographers were present at Cape Canaveral for the fourth flight of the space shuttle Columbia.  At the cape NASA will not permit photographers any nearer than three miles from the launch pad, because of the enormous power generated during the launch.  When the space shuttle takes off, it generates seven million horsepower, a noise level 1,000 times louder than a 747 and a temperature of 6000áµ’F.  However, remotely controlled cameras are allowed within 1,000 yards of the pad.  The area in which the cameras are located is a swampy one.

It was there that David M. Tenenbaum, Photographer for the Associated Press, placed his Leica R4 with APO Telyt-R 180mm lens, along with two other 35mm SLRs.  In the company of all the other press photographers, Tenenbaum set up his cameras the day before the launch.  About an hour after everybody had arranged their remote camera installations, Cape Canaveral was hit by a ferocious thunderstorm with 50 mph winds, hail and torrential rain.

When the storm was over Tenenbaum and his fellow photographers went out to check their cameras.  He recalls, “The water level was about eight inches higher than just three hours before.  And my tripod with the remote control box and three cameras all wrapped up in plastic was blown over and lying in the swamp water.”  After drying off the cameras, only one of them, the Leica R4, still worked and showed no evidence of water in the lens.  Tenenbaum replaced the other two cameras with a Leicaflex SL MOT and another 35mm camera.

It rained again briefly before the launch but all else went well.  When Tenenbaum recovered his cameras all had triggered properly.  Both Leicas were fine; the other camera had condensation in the lens.  The Leica photos were excellent and were widely published.  As Tenenbaum reports, “Of all the cameras AP had access to, my Leicas made the only useable negatives.”  Thirteen of the other camera makes were damaged, some beyond repair.

“Total damage to the press corps cameras had to be beyond $100,000.  And my R4 and Leicaflex had no problems and no lens condensation.”  Every non-Leitz lens he examined experienced condensation between the lens elements.


Tenenbaum sums up his experience: “It was nice to have the occasion to clearly see the advantage of Leitz gear and the edge it gave me over everyone else…

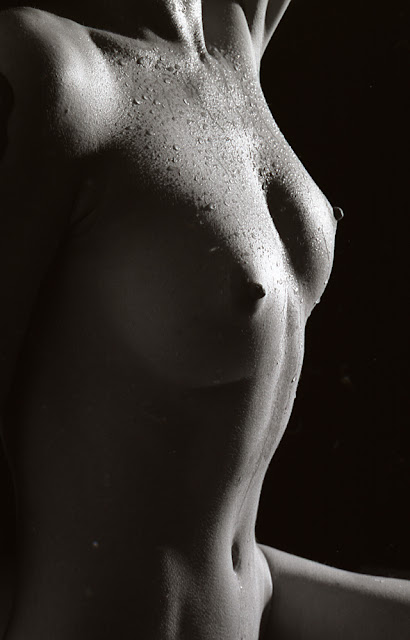
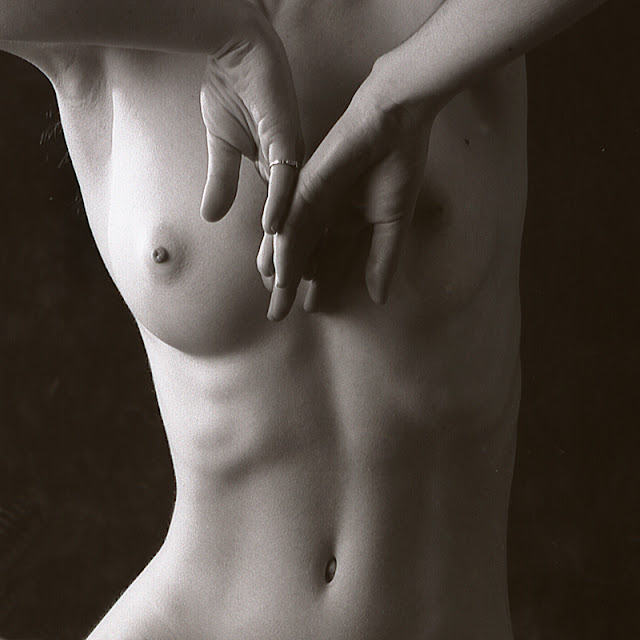
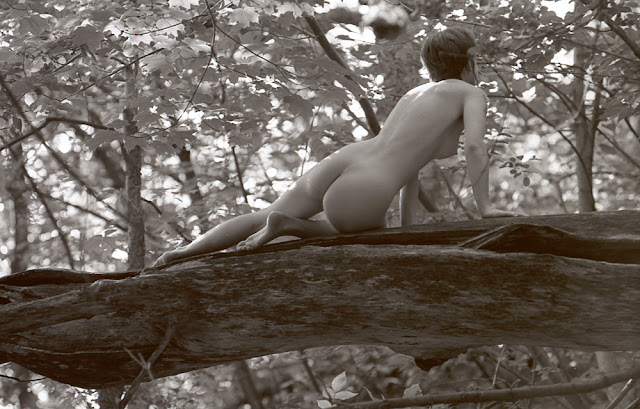
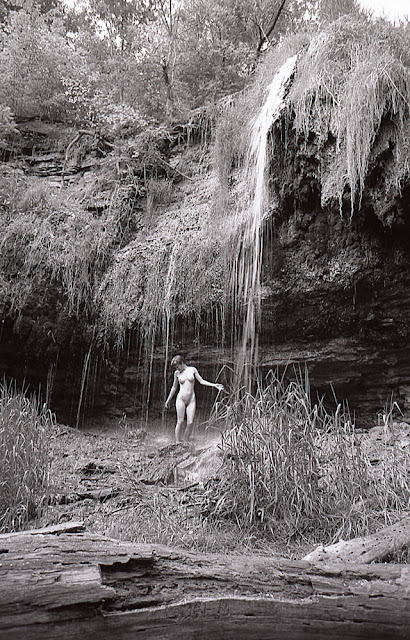
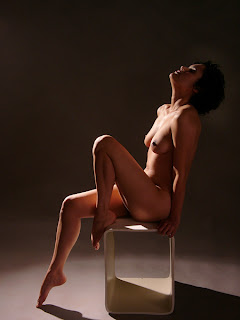
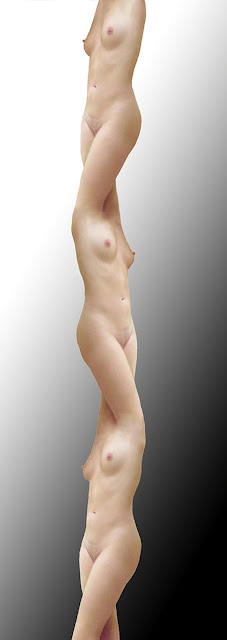
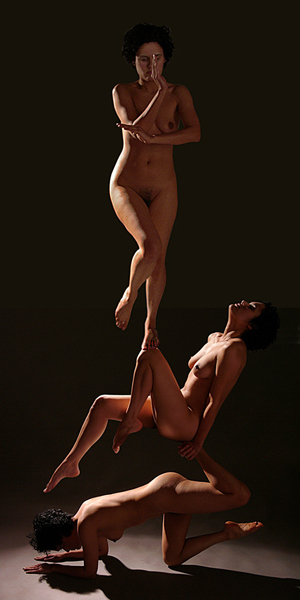
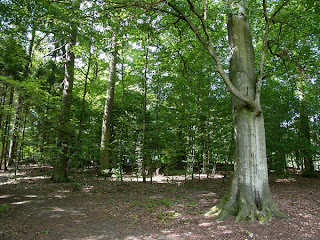
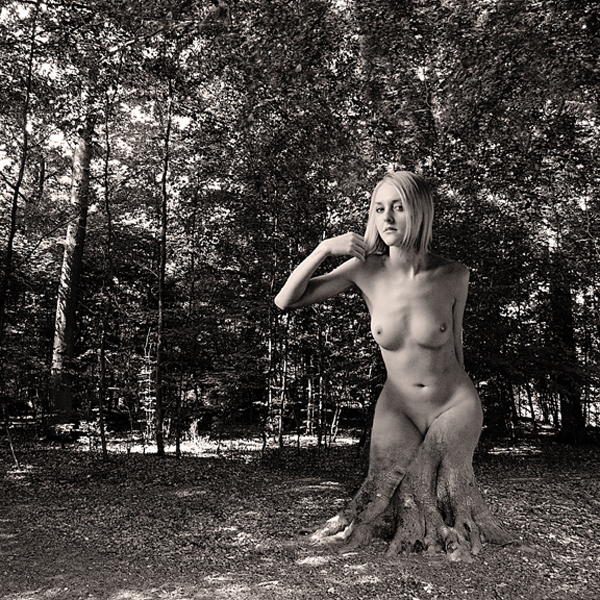
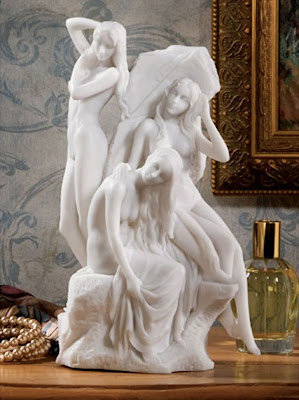
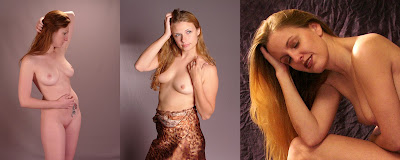
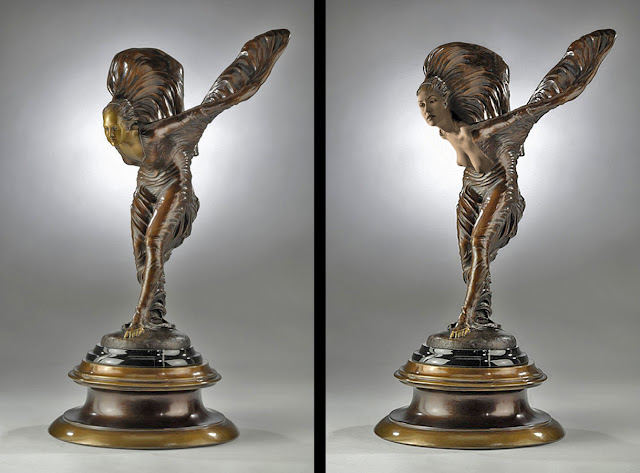
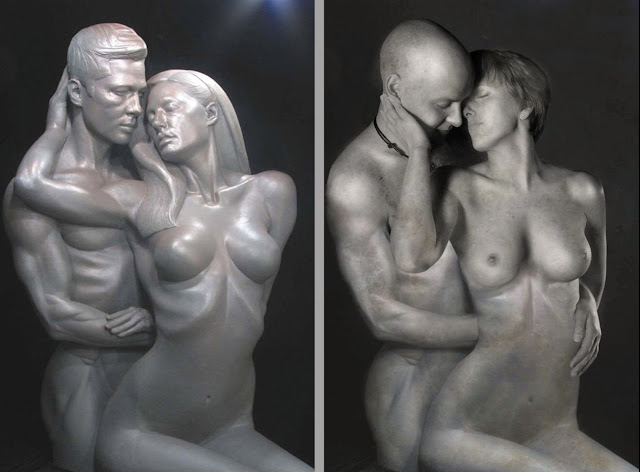
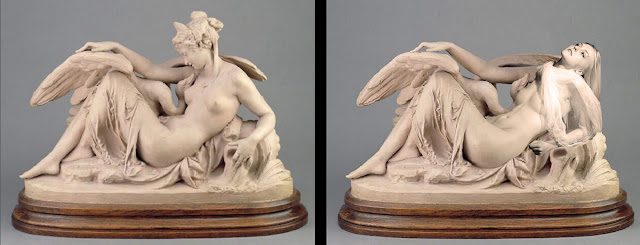
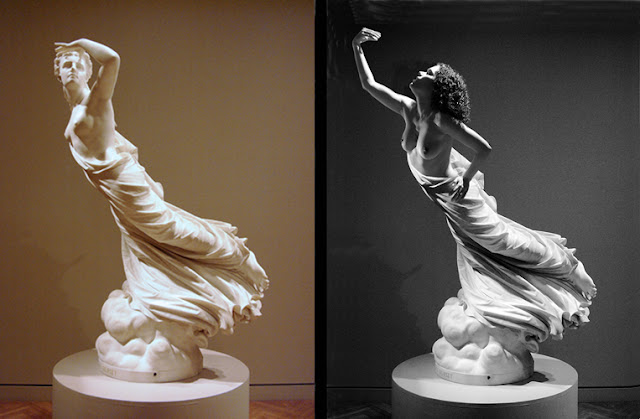
  Photo: David Tenenbaum